
Space Auto can provide direct access to your website to enable you to make minor changes, publish specials and coupons, add or remove employees from your staff page, or publish articles to your blog.
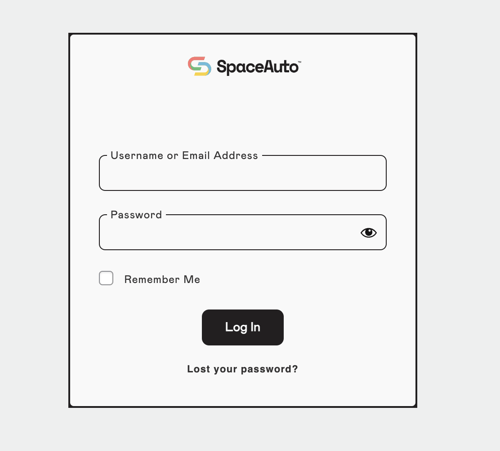
How to obtain your username and password
- To gain access to your website, simply email your Launch Manager or Client Advocate to request a username and password.
- Alternatively, you can submit a customer support ticket through the Space Auto website to request a username and password.
- Once access is granted, existing users who have forgotten their password can reset it by clicking the “Lost your password?” link on the login screen.
Logging in to your website
- To access the login screen, add “/space-admin” to the end of your dealership's URL (e.g., cardealership.com/space-admin).
- If you encounter any issues, your Client Advocate can provide a direct link to your login page via email.
- Enter your username and password.
- Upon successful login, you will be directed to your website's “Dashboard,” where you can navigate to various sections of your site
Staff: Editing your staff pages
Once you are logged in you can access your staff pages from the dashboard. You will access the dashboard by default upon logging in and you can return to the dashboard at any time by visiting your home page, selecting your website name from the black menu bar at the top, and clicking dashboard.
Accessing Staff Pages or Creating New Staff Pages
- Click on “Staff” in the menu on the left
- Select “All Staff”
- Hover your cursor over any staff member to “edit” that staff page.
- Click “Add New” in the top right to create a new staff page.
- After accessing an existing page, or creating a new one, you can modify the following information:
- Page Title: Enter the full name of the staff member.
- Text Editor: In most circumstances you can leave this field blank, but it may be possible to add descriptive text here if desired.
- Staff Title: The role or title of the staff member such as “Sales Manager”.
- Slug: This will be automatically filled in to match the Page Title, but you may manually define a slug in the URL if desired.
- Departments: You can tag staff members by their department using the checkboxes in the “Department” subsection on the right side of the page. Click “Add New Department” to create new selectable options. It is possible to assign a single staff member to multiple departments.
- Featured Image: Users can upload a headshot or photo of the staff member in the featured image section.
Publishing, Unpublishing, or Deleting Staff Pages
- After selecting “edit” on an existing page or clicking “Add New” you can view and edit the publication status of each Staff Member page in the “Publish” subsection at the top right of each page.
- Publish a new page by clicking the “Publish” button.
- Save your progress on an unpublished page without publishing by clicking the gray “Save Draft” button.
- You can unpublish a staff page by clicking “Edit” next to “Status: Publish” and selecting “Draft” and clicking “OK”.
- You can permanently delete a staff page by clicking “Move to Trash”
Posts: Publishing blog articles
Once you are logged in you can access your blog posts from the dashboard. You will access the dashboard by default upon logging in and you can return to the dashboard at any time by visiting your home page, selecting your website name from the black menu bar at the top, and clicking dashboard.
Accessing Blog Posts or Creating New Blog Posts
- Click on “Posts” in the menu on the left
- Select “All Posts”
- Hover your cursor over the title of any blog post in the list to reveal the option to “edit” that blog post.
- Click “Add New” in the top right to create a new blog post.
- After accessing an existing post, or creating a new one, you can modify the following information:
- Blog Title: Enter the title of your blog
- Text Editor: You can write blog content in the editor or paste copy from an outside source. You can insert photos directly into your blog post in the editor by clicking the “Add Media” button in the toolbar at the top of the editor.
- Yoast SEO: Most websites will contain a Yoast SEO editor at the bottom of the page. This information will be filled out automatically, but you can enter your own SEO title, slug, or Meta Description if you would like to.
- Categories: Optionally, you may assign Categories by selecting one or more checkboxes in the the drop down menu in the column on the right. Categories are used to divide blog posts into broad types based on their content or topics.
- Tags: Optionally, you may assign Tags by selecting one or more checkboxes in the the drop down menu in the column on the right. Tags are used to mark sub-topics or ideas contained inside blogs and make it possible to search out blogs containing various tags.
- Featured Image: The featured image can be uploaded in the subsection in the column on the right. This is the image which will show on the main blog page. You should crop and size images to be a consistent ratio and ideally less than 500kb.
- Excerpt: Users can define the short text preview that is shown on the main blog page using the Excerpt section in the right column. This is optional.
Publishing, Unpublishing, or Deleting Blog Posts
- After selecting “edit” on an existing post or clicking “Add New” you can view and edit the publication status of each blog post in the “Publish” subsection at the top right of each page.
- Publish a new page by clicking the “Publish” button.
- Save your progress on an unpublished page without publishing by clicking the gray “Save Draft” button.
- You can unpublish a blog post by clicking “Edit” next to “Status: Publish” and selecting “Draft” and clicking “OK”.
- You can permanently delete a blog post by clicking “Move to Trash”
Pages: Making edits to your website content
Once you are logged in you can access your website pages from the dashboard. You will access the dashboard by default upon logging in and you can return to the dashboard at any time by visiting your home page, selecting your website name from the black menu bar at the top, and clicking dashboard.
What types of edits can I make to pages on my website?
Space Auto manages website pages using a classic WordPress editor and a custom drag-and-drop page building tool called “Space Builder”.
- Users can make light edits to page properties the title, featured image, and publication status of pages using the classic WordPress editor.
- Advanced users may access the Space Builder to modify the content of the page including the layout, photos, videos, and written copy.
- However, Space Auto recommends that all changes to the actual content of the page be made by our team of Web Designers. Customers can contact their Client Advocate or file a ticket online to request changes.
Basic Page Edits With The Classic Editor
- After logging in click on “Pages” in the menu on the left
- Select “All Pages”
- Hover your cursor over the title of any page in the list to reveal the option to “edit” that page.
- Click “Add New” in the top right to create a new page.
- The classic page editor will open.
- Warning: Do not click “Use Standard Editor”. Instead simply scroll down the page to access the following information.
- Page Title
- Yoast SEO: Most websites will contain a Yoast SEO editor at the bottom of the page. This information will be filled out automatically, but you can enter your own SEO title, slug, or Meta Description if you would like to.
- Featured Image: The featured image can be uploaded in the subsection in the column on the right. This image may show up at the top of the page, depending on the page settings. You should crop and size images to be a consistent ratio and ideally less than 500kb.
- Publication Settings: Consult the instruction below to learn about publishing, unpublishing, or deleting pages.
Advanced Page Modifications With Space Builder
- Caution: Please note that the Space Builder is only recommended for experienced users. In most circumstances Space Auto can make modifications on your behalf.
- After logging in click on “Pages” in the menu on the left
- Select “All Pages”
- Hover your cursor over the title of any page in the list to reveal the option to “edit” that page.
- Click “Add New” in the top right to create a new page.
- The classic page editor will open.
- Click “Launch Space Builder” to open the drag-and-drop page editor
- Edit existing content by hovering over the content and clicking on the highlighted sections.
- Add new modules by clicking the plus sign in the top right of the page.
- Save your draft or publish changes using the button at the top right.
- Contact your Client Advocate if you would like to request in-depth training resources and how-to guides with videos.
Publishing, Unpublishing, or Deleting Pages
- After selecting “edit” on an existing page or clicking “Add New” you can view and edit the publication status of each page in the “Publish” subsection at the top right of the page.
- Publish a new page by clicking the “Publish” button.
- Save your progress on an unpublished page without publishing by clicking the gray “Save Draft” button.
- You can unpublish a page by clicking “Switch to Draft”
- You can permanently delete a page by clicking “Move to Trash”
Service Specials: Editing your service specials
Once you are logged in you can access your service specials from the dashboard. You will access the dashboard by default upon logging in and you can return to the dashboard at any time by visiting your home page, selecting your website name from the black menu bar at the top, and clicking dashboard.
Accessing Service Specials or Creating New Service Specials
- Click on “Service Specials” in the menu on the left
- Select “All Service Specials”
- Hover your cursor over the title of any Service Special in the list to reveal the option to “edit” that Service Special.
- Click “Add New” in the top right to create a new Service Special.
- After accessing an existing Service Special, or creating a new one, you can modify the following information:
- Title: The title of the Service Special which will be displayed publicly
- Hero Content: The hero content fields are not applicable and can be safely ignored.
- Special Description - Above: Optional descriptive text that appears about the title.
- Special Description - Main: The primary description that is displayed below the title of the special.
- % or $: Choose whether the special will be an exact dollar amount ($) or a percentage (%)
- Price
- Disclaimer: Optional, if desired.
- Image / Icon: The image can be uploaded in the subsection in the column on the right. This is the image which will show on the Service Special itself. You should crop and size images to be a consistent ratio and ideally less than 500kb.
- Status
- Yoast SEO: Most websites will contain a Yoast SEO editor at the bottom of the page. This information will be filled out automatically, but you can enter your own SEO title, slug, or Meta Description if you would like to.
Publishing, Unpublishing, or Deleting Service Specials
- After selecting “edit” on an existing Service Special or clicking “Add New” you can view and edit the publication status of each Service Special page in the “Publish” subsection at the top right of each page.
- Publish a new page by clicking the “Publish” button.
- Save your progress on an unpublished page without publishing by clicking the gray “Save Draft” button.
- You can unpublish a service special by clicking “Edit” next to “Status: Publish” and selecting “Draft” and clicking “OK”.
- You can permanently delete a service special by clicking “Move to Trash”
Ad Campaigns: Managing your on-site ad campaigns
Once you are logged in you can access your ad campaigns from the dashboard. You will access the dashboard by default upon logging in and you can return to the dashboard at any time by visiting your home page, selecting your website name from the black menu bar at the top, and clicking dashboard.
Accessing Ad Campaigns or Creating New Ad Campaigns
- Click on “Ad Campaigns” in the menu on the left
- Select “All Ad Campaigns”
- Hover your cursor over the title of any Ad Campaign in the list to reveal the option to “edit” that Ad Campaign.
- Click “Add New” in the top right to create a new Ad Campaign.
- After accessing an existing Ad Campaign, or creating a new one, you can modify the following information:
- Title: The title of the Ad Campaign which is copied into the URL by default
- Ad Link: Paste the URL of the page that you want the Ad Campaign to promote. Campaign buttons and calls-to-action will link to this provided URL.
- Background Image (Landscape): This only applies to the SRP Carousel placement and can be left blank if this placement is not being used.
- Background Image (Portrait): This only applies to the SRP Card placement and can be left blank if this placement is not being used.
- Image Overlay Opacity: This value defines the darkness of the translucent overlay on top of the banner. The greater the value from 0 - 1, the darker the opacity. Does not apply to the Banner Notification placement.
- Main Text: The main text of the advertisements in the campaign.
- Secondary Text: This does not apply to the Banner Notification placement and can bbe left blank if no other placement is applied.
- Button Text: Leave empty to hide the button.
- Disclaimer Text: Leave empty for no disclaimer. Does not apply to the Banner Notification placement.
- Start Date/Time and End Date/Time
- Hide When Dismissed: If a user dismisses this ad, do not show again until the cookie expires.
- Open In New Tab: Setting this toggle to Yes causes the Ad Link to open in a new tab.
- Cookie Timeout
Types of Ad Placements
There are four types of Ad Placements available for each campaign. Multiple Ad Placements can be assigned to the same campaign. The Ad Placement determines the formatting of the advertisement and where the advertisement will appear on the website. Please note that it is not possible for users to add new Ad Placements.
- Banner Notification: A thin text-based banner with a single button that appears at the top of all website pages including the home pages.
- You can use the Ad Settings - Banner Notification toggles to exclude the banner from search results pages and/or vehicle detail pages.
- Global Carousel: This is a slideshow style advertisement that can be flexibly placed throughout the website including the VDP, Finance page, Service page, and more. Contact your Client Advocate to request custom placements.
- SRP Card: The SRP Card placement appears alongside the vehicle cards inside the Search Results Pages.
- The “Insert Before Card” setting will appear when this placement is selected. The higher the number entered, the less frequently the SRP Card will appear.
- SRP Carousel: The SRP Carousel is a slideshow-style advertisement that appears at the top of search results pages.
- When this placement is selected additional settings will appear to allow users to customize which search results pages display the selected campaign.
Publishing, Unpublishing, or Deleting Ad Campaigns
- Please note that the Start Date / Time and End Date / Time and placement settings will override publication status. Published Ad Campaigns will not show up outside of the chosen time range or chosen placements.
- After selecting “edit” on an existing Ad Campaign or clicking “Add New” you can view and edit the publication status of each Ad Campaign page in the “Publish” subsection at the top right of each page.
- Publish a new page by clicking the “Publish” button.
- Save your progress on an unpublished page without publishing by clicking the gray “Save Draft” button.
- You can unpublish an Ad Campaign by clicking “Edit” next to “Status: Publish” and selecting “Draft” and clicking “OK”.
- You can permanently delete an Ad Campaign by clicking “Move to Trash”